How to use Fluent
Prepare a material, speak along with the model, and let AI analyse your recording. This guide walks through every screen in that loop. New here? Read from the top; otherwise jump in from the table of contents.
Contents
/loginGetting started — your account and the free trial
All you need is an email address. Every feature is free for 14 days after you sign up.
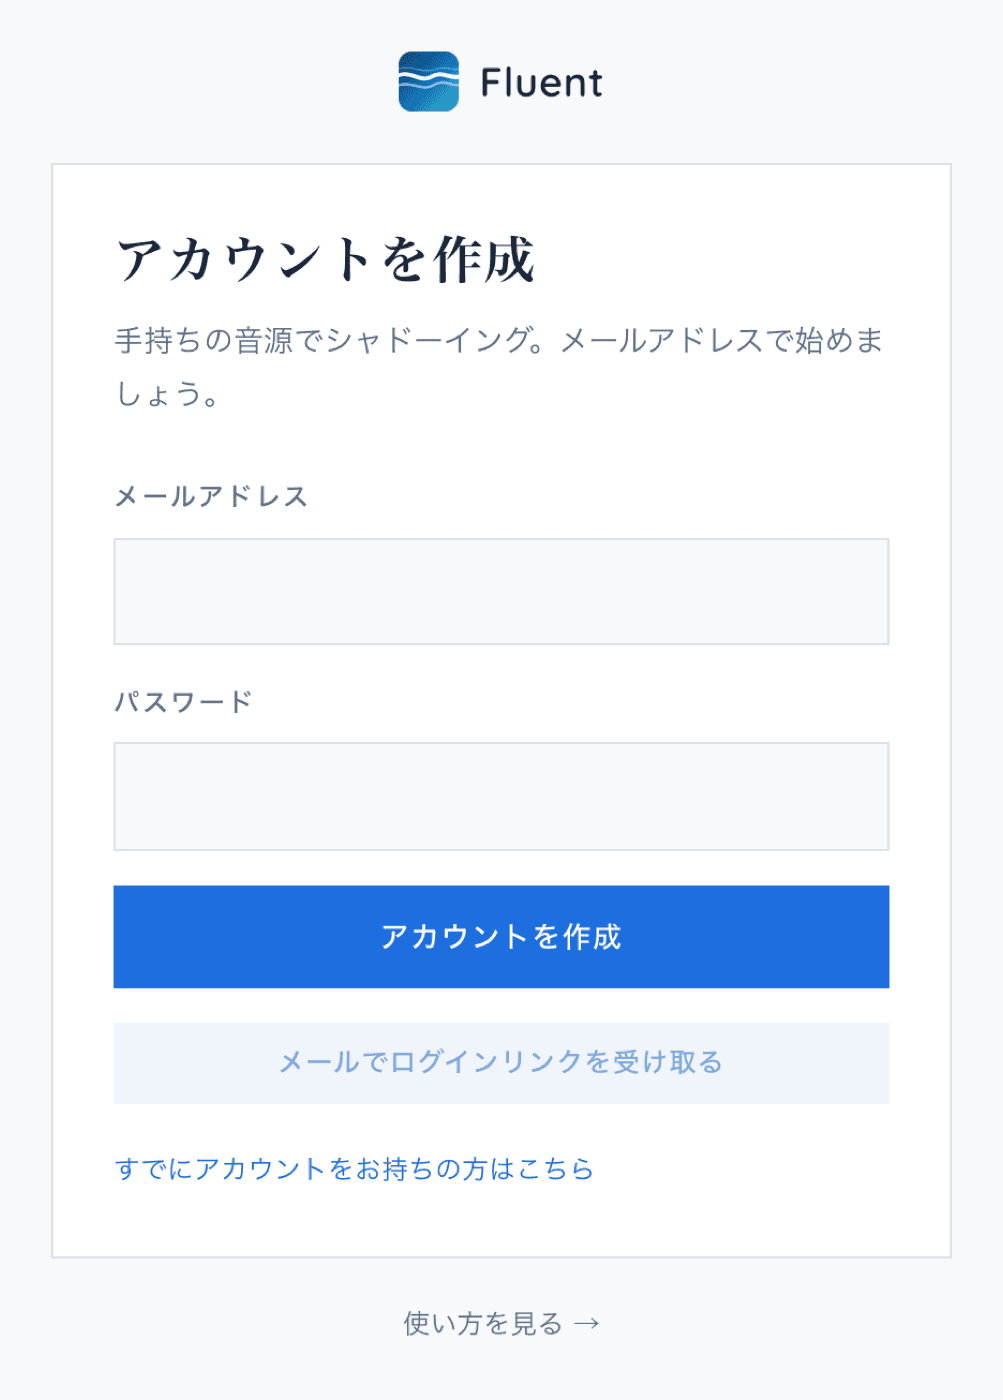
On the sign-in page choose “No account yet? Create one”, enter your email address and a password (6+ characters), and press “Create account”.
If a confirmation email arrives, open the link in it to finish signing in. You can also use “Email me a sign-in link” instead of a password.
After signing in you land in the library. The bar at the top shows how many trial days are left.
To keep going after the trial, subscribe to Pro on “Plan & billing” (/billing). See section 10.
/createCreate a material from your own audio
Cut the part you want out of a podcast, a video's audio or any mp3 / m4a (wav works too) and turn it into a material.
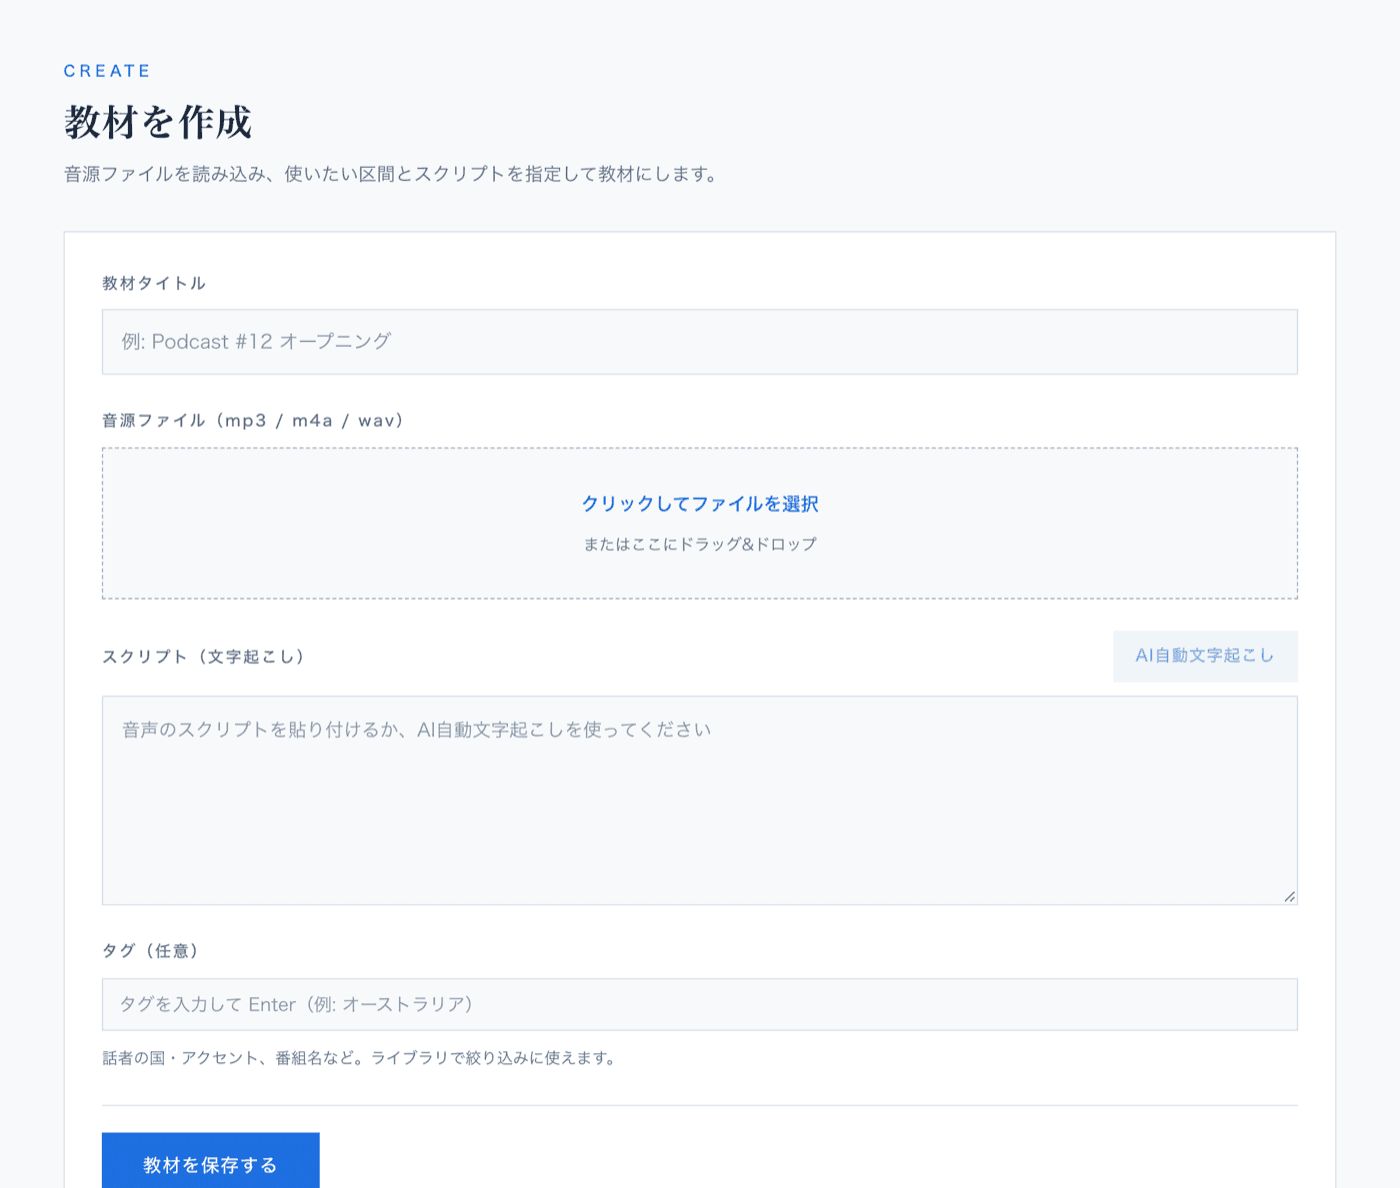
Open “Create material” in the sidebar and enter a title. Press “Click to choose a file” or drag & drop the file (up to 80 MB / 30 minutes).
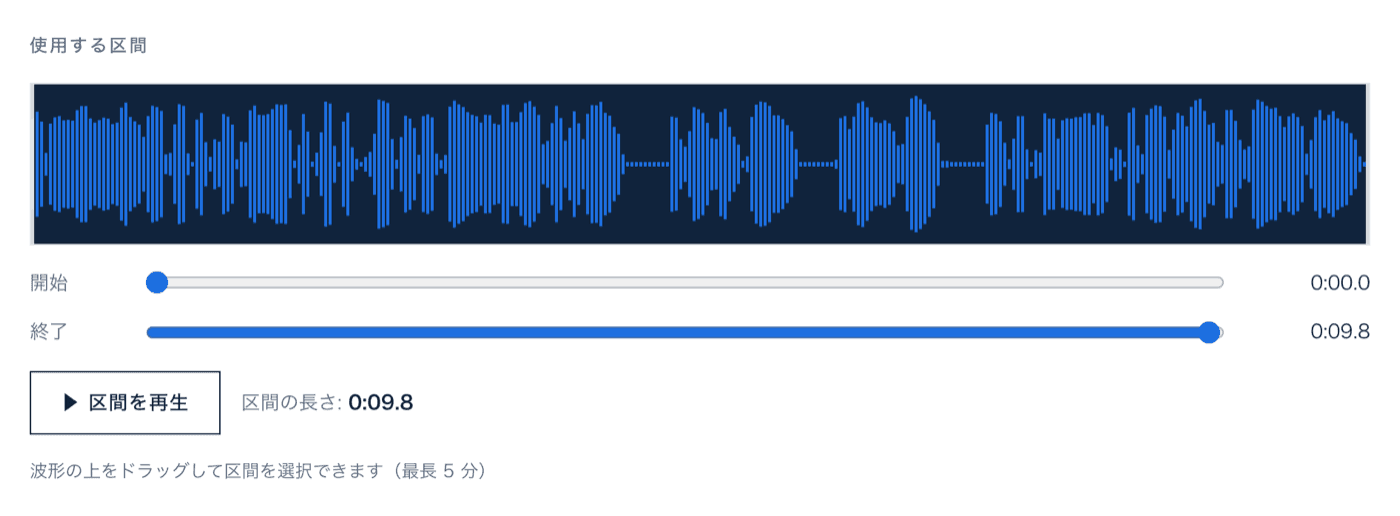
Once the waveform appears, choose the region: drag on the waveform or move the “Start” / “End” sliders, and check it with “▶ Play region”. One material can cover up to 5 minutes.
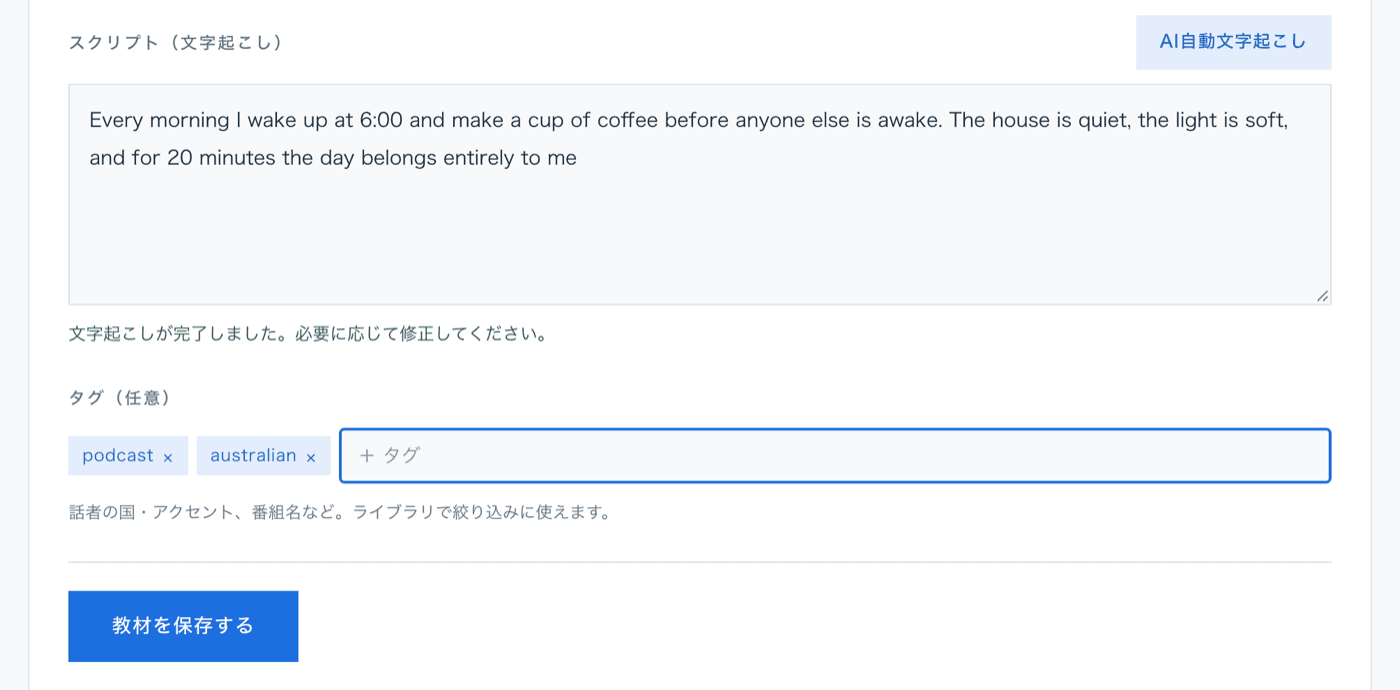
Press “AI transcription” and the region becomes a script within a few dozen seconds. Fix any mistakes directly in the text; per-word timings are estimated automatically.
Optionally add tags (the speaker's country or accent, the show's name…) and press “Save material”. The practice screen opens right away.
/presetsUse the preset materials
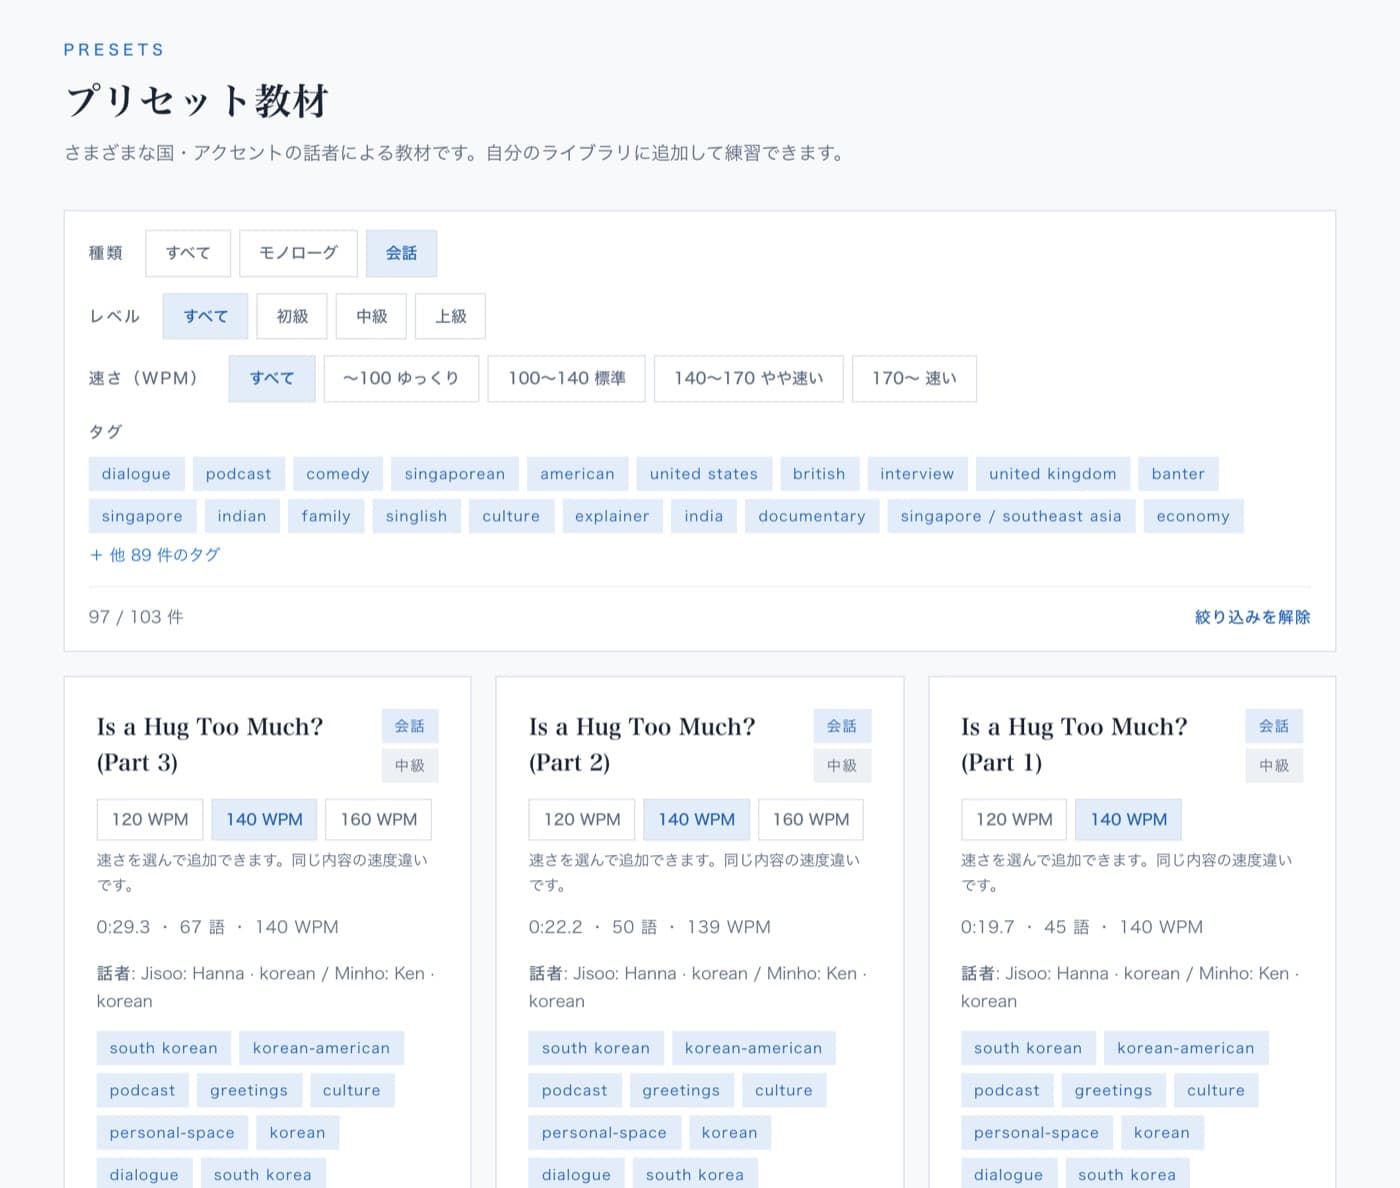
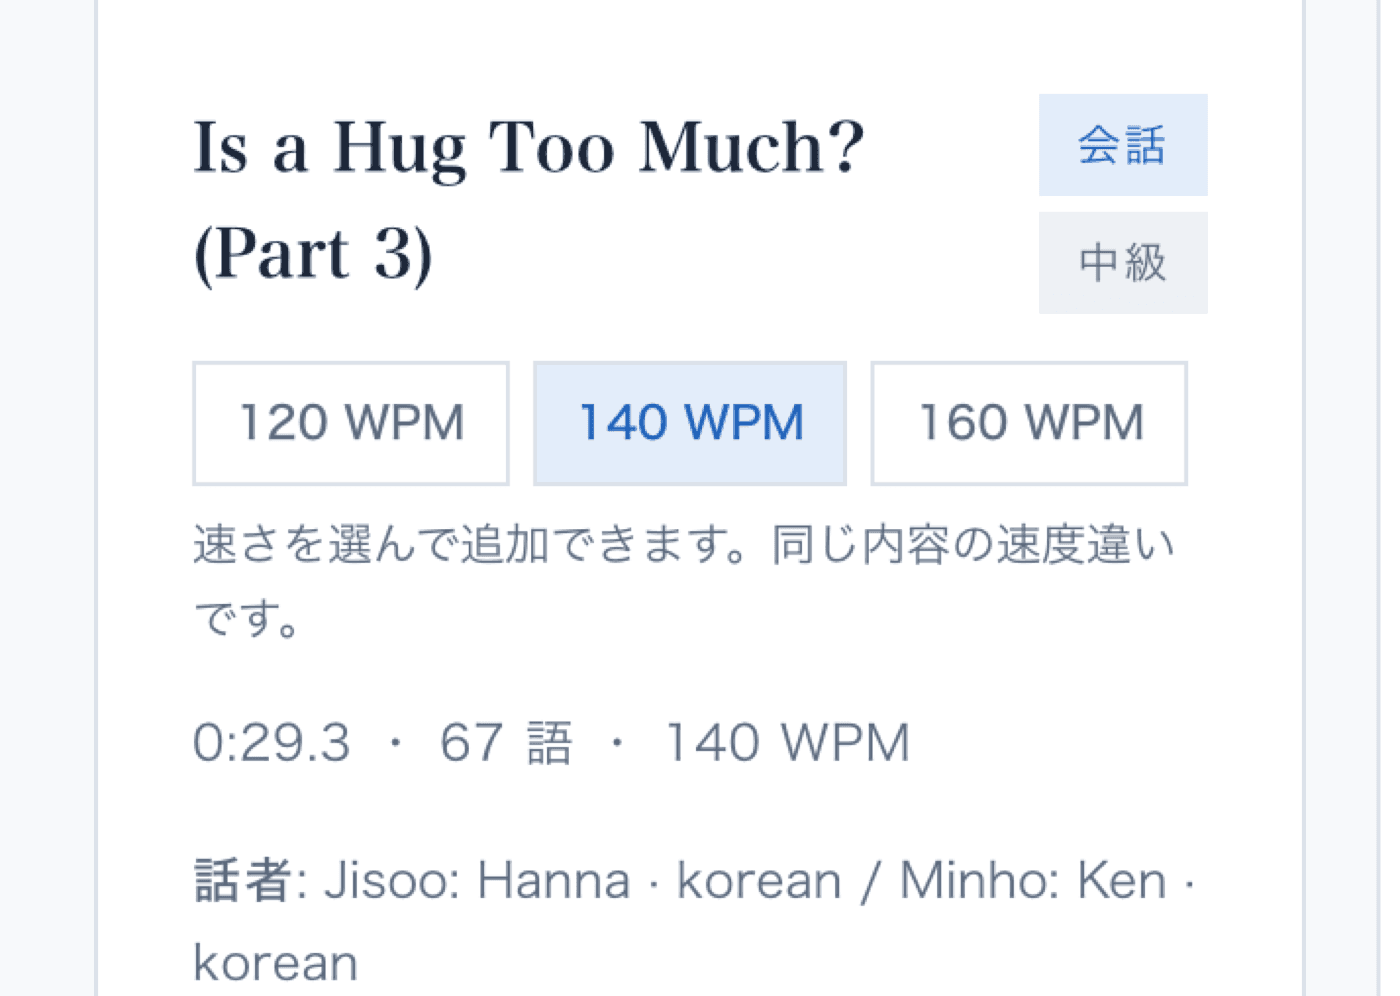
No audio of your own? Presets by speakers from many countries and accents come at three speeds: 120 / 140 / 160 WPM.
Open “Presets” in the sidebar. The filters at the top narrow the list by type (monologue / dialogue), level, speed (WPM) and tags (accent or topic).
Pick the speed on the card with “120 WPM / 140 WPM / 160 WPM” — the same content at different tempos; the level and duration on the card follow your choice. “▶ Preview” plays the clip.
Press “Add to my library”: the material is copied into your library and the practice screen opens. Presets you already added show “Practice” instead.
Dialogues (two or more speakers) can be practised as role-play on the practice screen (section 4).
/practiceThe shadowing practice screen
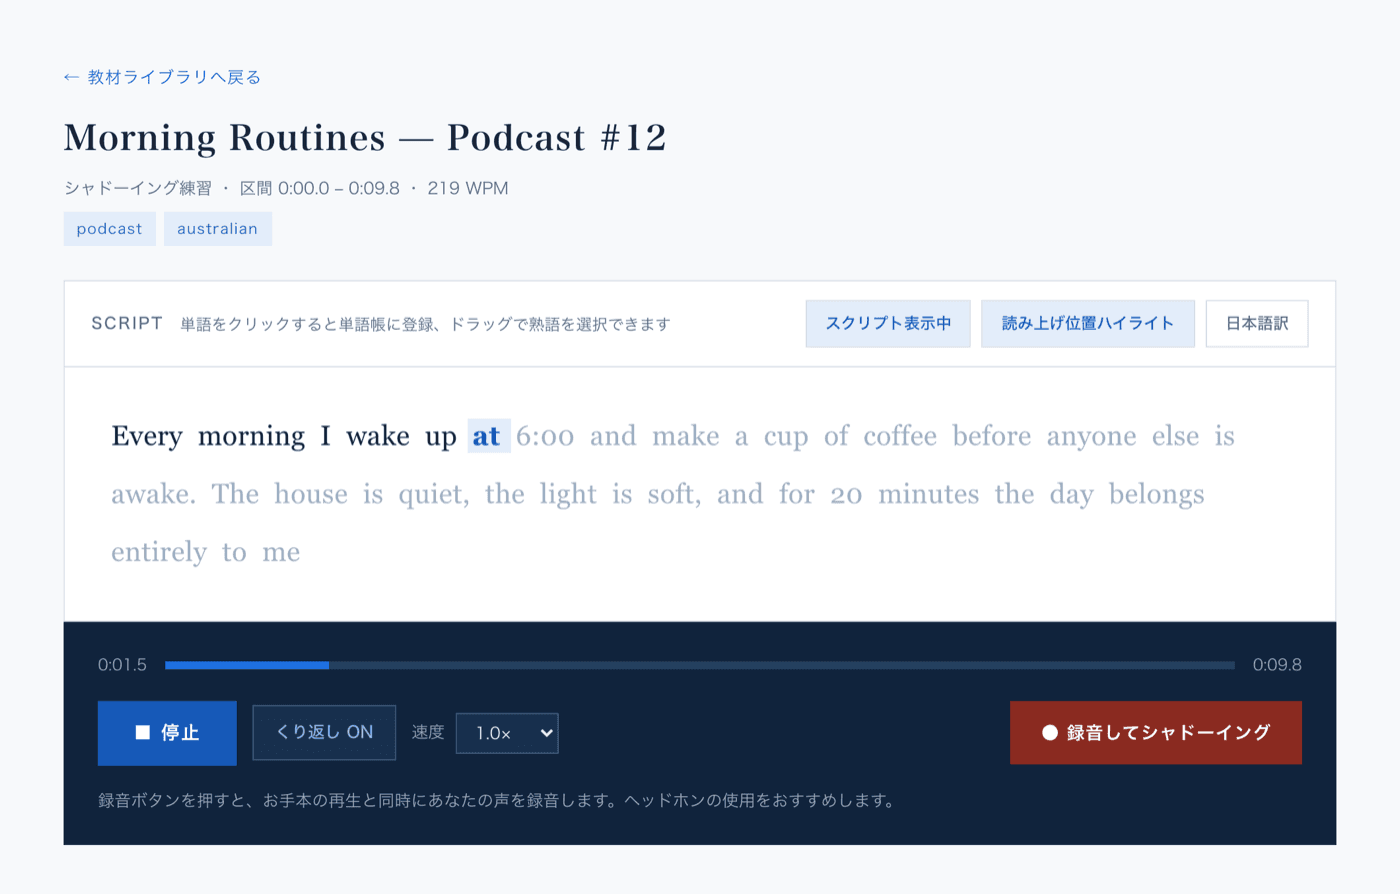
Shadowing means speaking along with the model, a beat behind it. Here is what each part of the screen does.
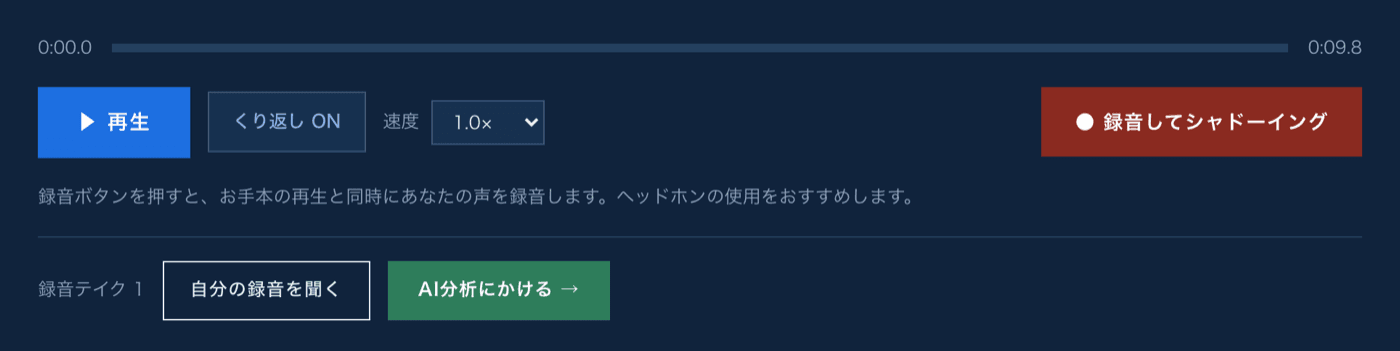
“▶ Play” starts the model and “■ Stop” stops it (the space bar works too). With “Loop ON” the region repeats.
“Speed” offers 0.5× to 1.5×. Slow it down when you cannot catch the words, then move back up to 1.0× and beyond. The default lives in Settings.
“Script shown / hidden” hides the text. With “Karaoke highlight” on, the current word lights up as the audio plays.
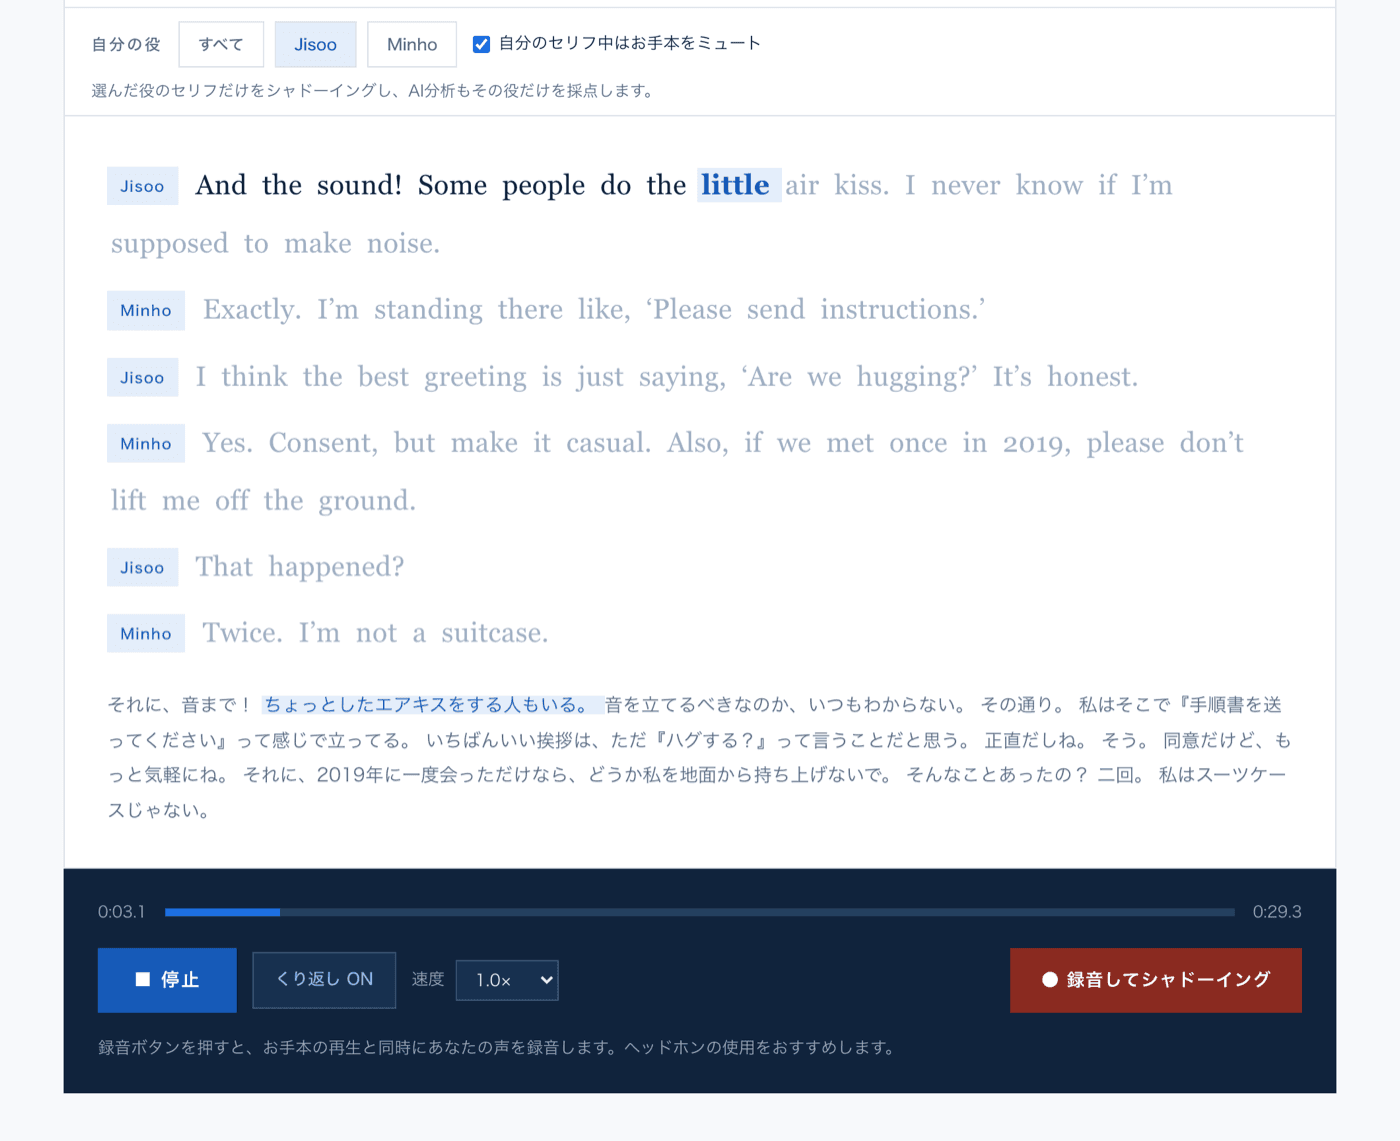
“Japanese translation” asks AI for a sentence-by-sentence Japanese translation and shows it under the English (a few seconds the first time). Press again to hide it.
In dialogues, “My role” picks a speaker: you practise only that role's lines and the AI analysis scores only those. Tick “Mute the model during my lines” and the model goes silent on your turn, so it feels like a real conversation.
/practice/analysisRecord a take and let AI analyse it
Your voice is recorded alongside the model and scored word by word on pronunciation, rhythm and intonation.
Press “● Record and shadow”. The first time, the browser asks for microphone access — allow it. The model plays once; speak along with it. Recording stops by itself when the model ends.
When the “Take 1” row appears, “Listen to my take” plays it back. Not happy? Record again — the new take replaces it.
Press “Analyse with AI →”. The take is uploaded and the report opens within a few dozen seconds.
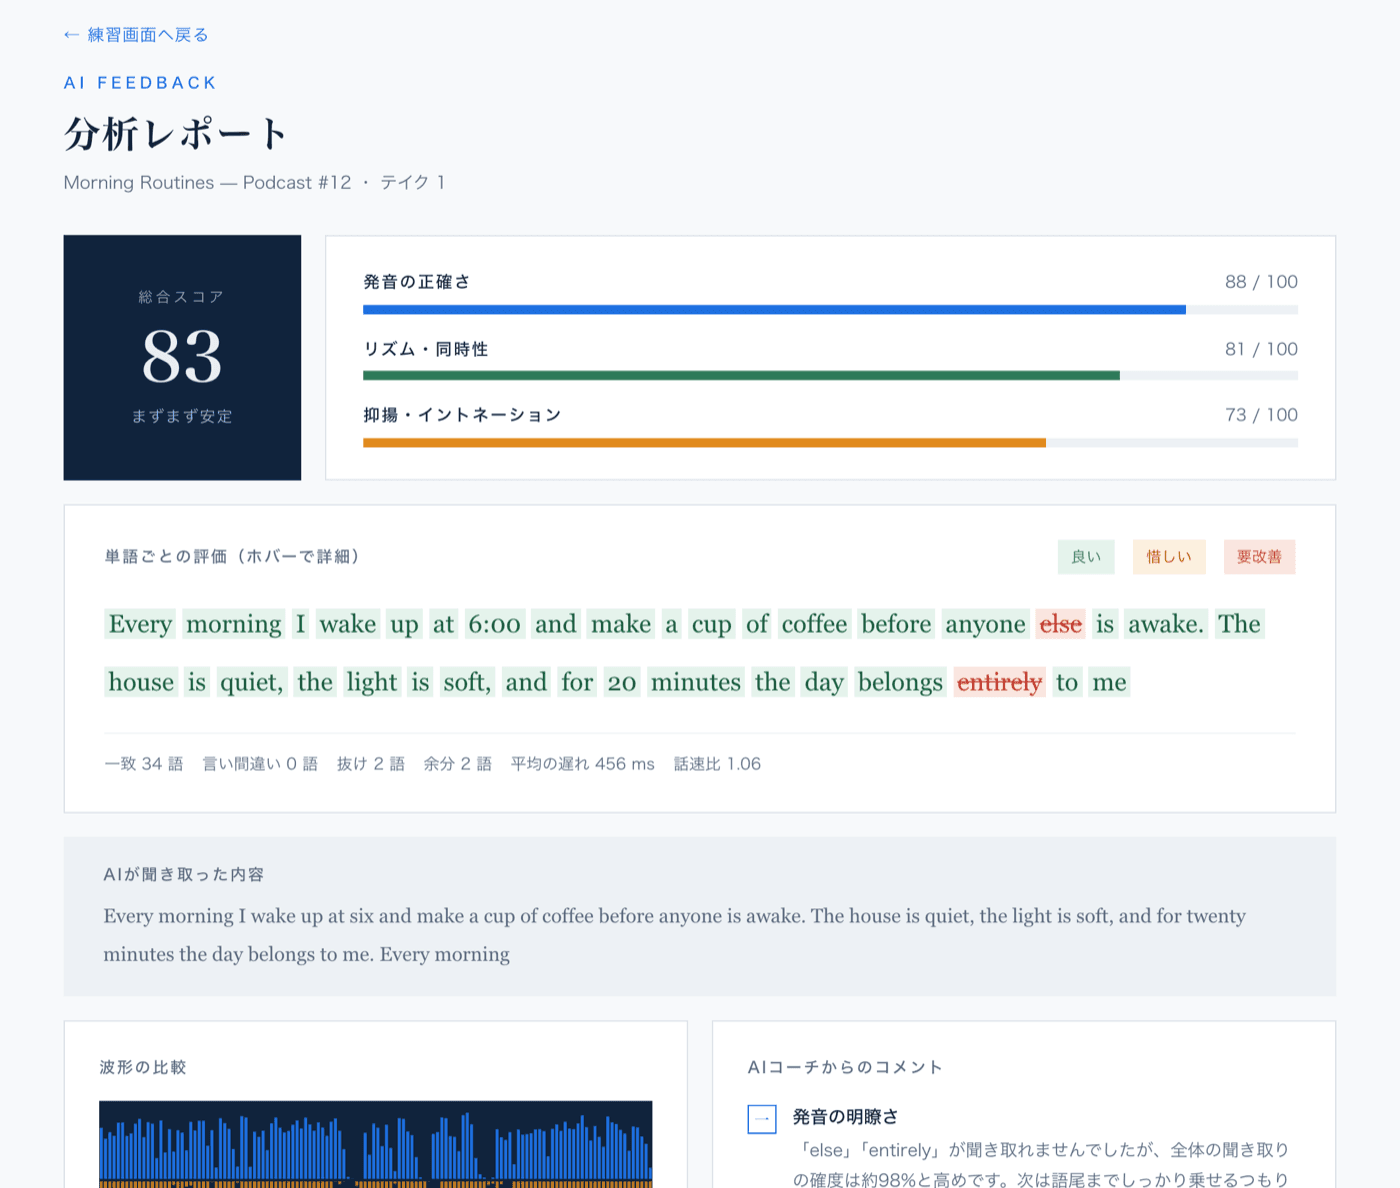
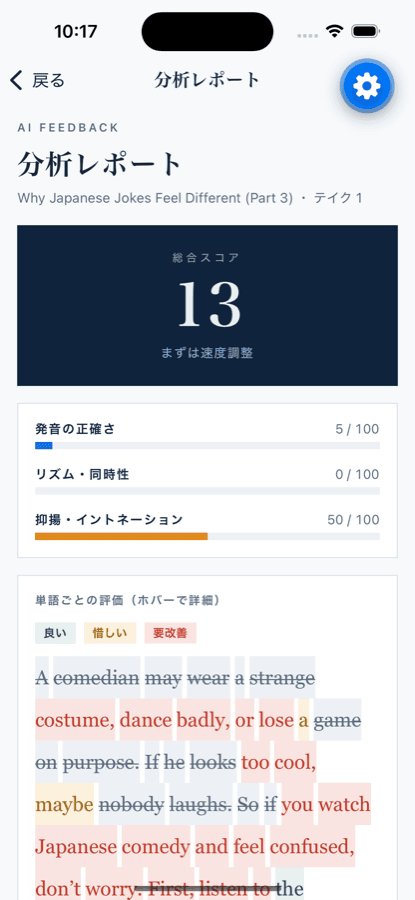
Reading the report: the “Overall score” on the left and the three parts “Pronunciation”, “Rhythm & timing” and “Intonation”. Words are colour-coded — green = good, yellow = close, red = needs work (missed words are struck through). Hover a word to see what was heard and how far behind it was.
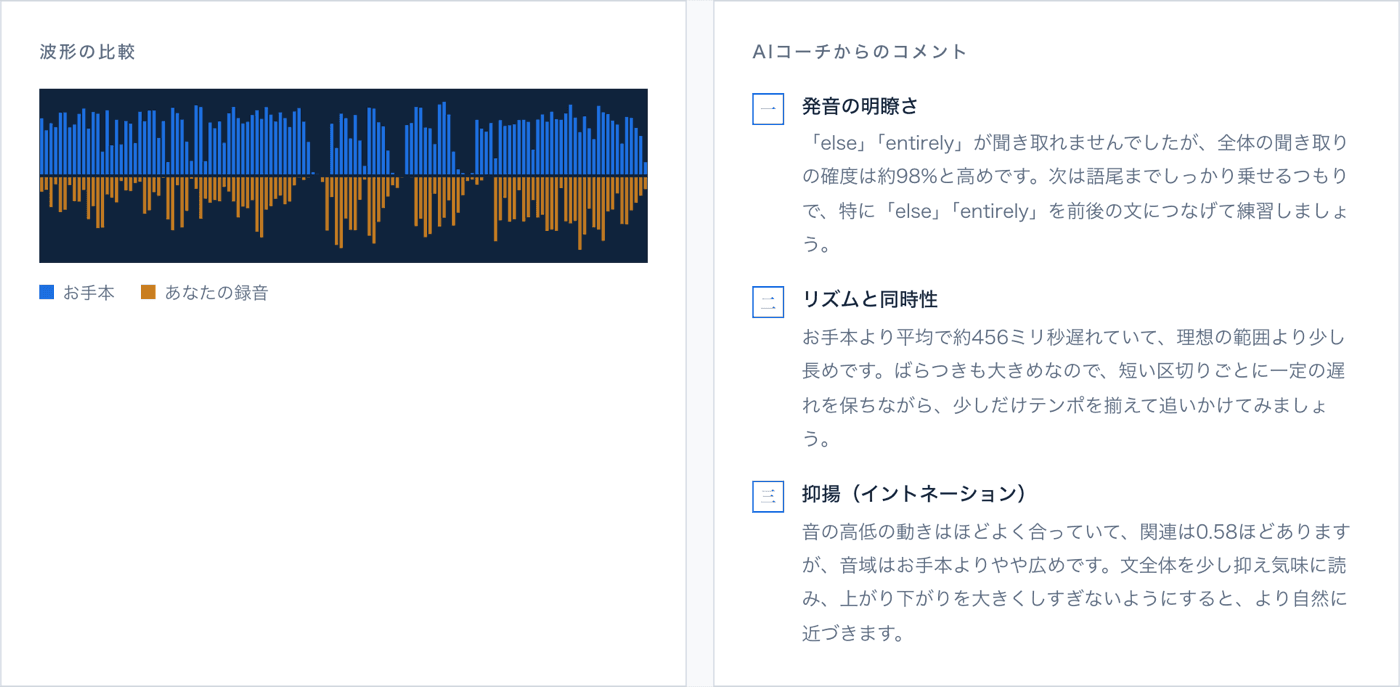
“Comments from the AI coach” below names the one thing to fix in the next take, from three angles. “What the AI heard” shows the recognised text. When you recorded with a role selected, the report says “Scored: lines of … only”.

/vocabularySave words to the vocabulary book
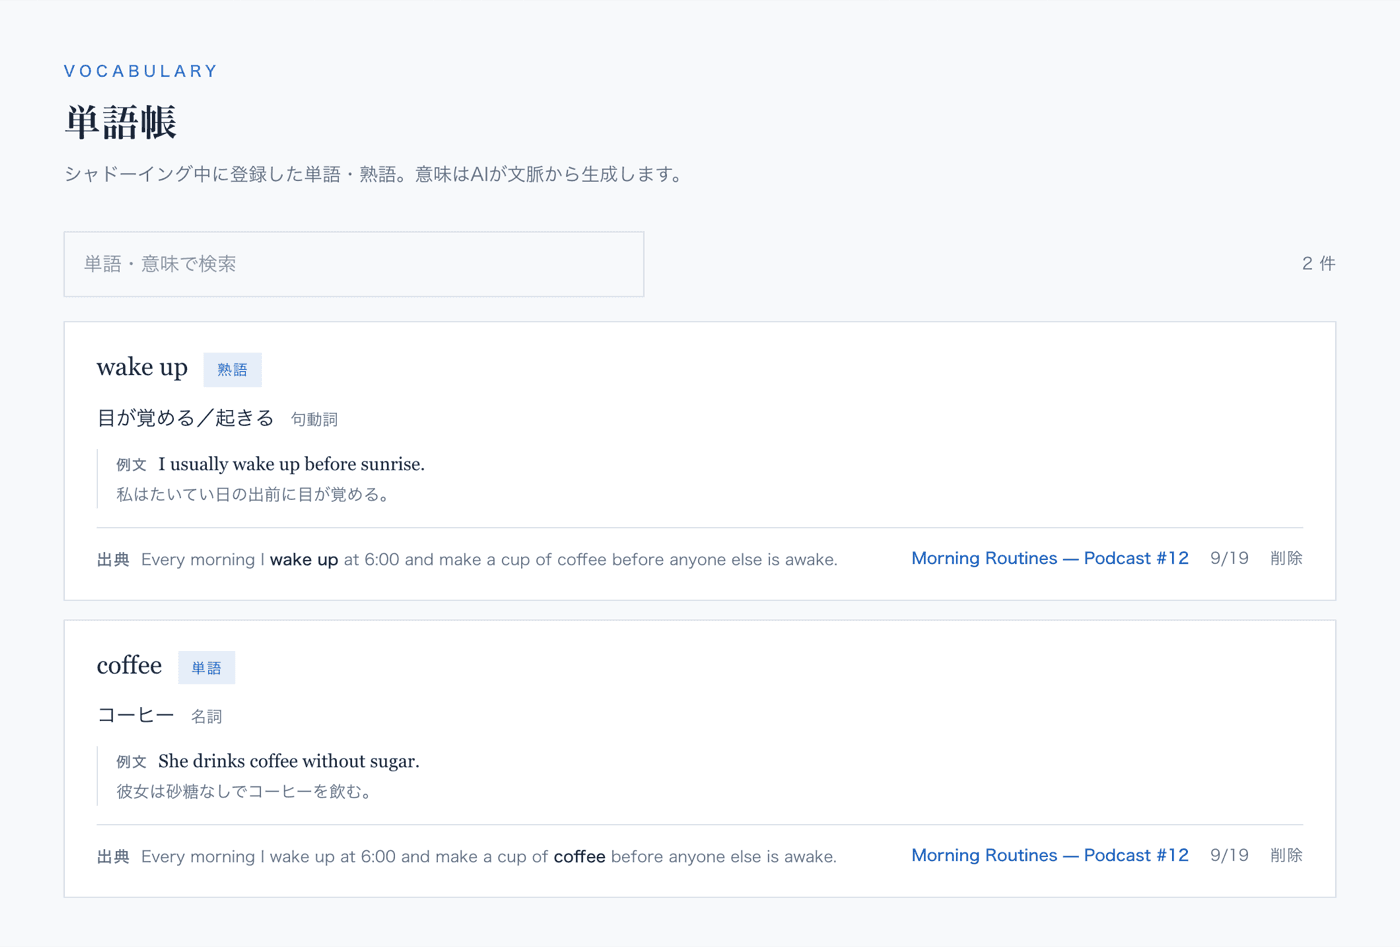
Save the words and phrases that catch your attention while you practise. AI writes a meaning that fits the context.
In the script on the practice screen, click a word once to save it. Saved words get a dotted underline.
For a phrase (several words), drag from the first word to the last and press the “Save “…” to vocabulary” button that appears.
The meaning, part of speech and an example sentence are generated by AI. “Vocabulary” in the sidebar lists everything, with a search box for words and meanings.
“Regenerate meaning” retries an item whose meaning failed, and “Delete” removes one. “Open material” takes you back to the source.
/historyTrack your progress in History
Practice time and scores are recorded automatically.
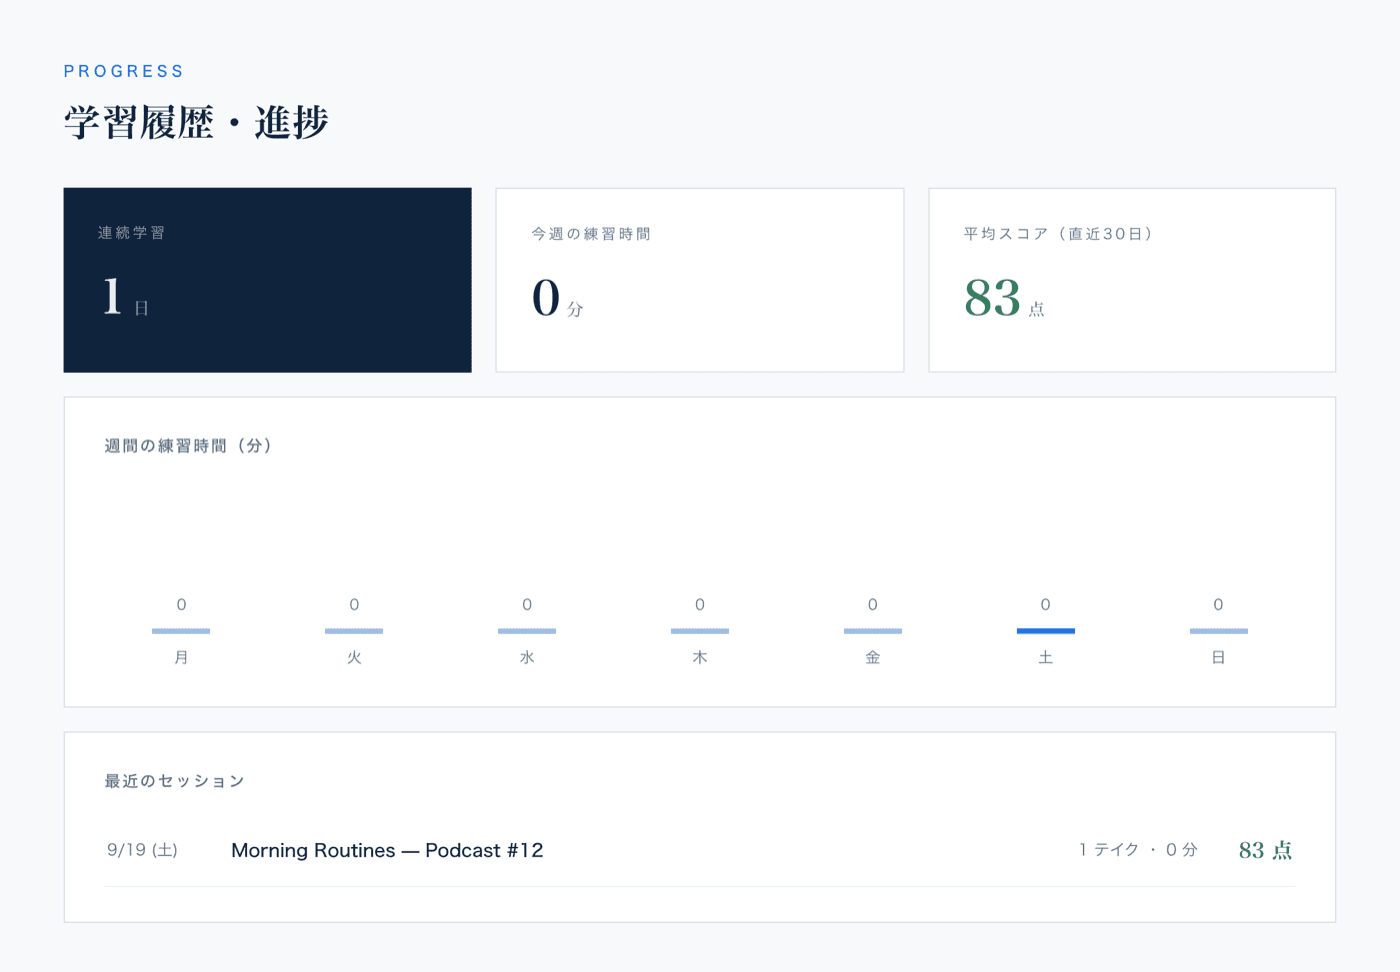
Open “History & progress” in the sidebar. The three tiles show your streak (consecutive days), this week's practice minutes and the 30-day average score.
The bar chart shows practice minutes from Monday to Sunday, counted from the time the model played or a take was recorded on the practice screen.
“Recent sessions” lists the date, material, number of takes, minutes and score.
/Organise your library
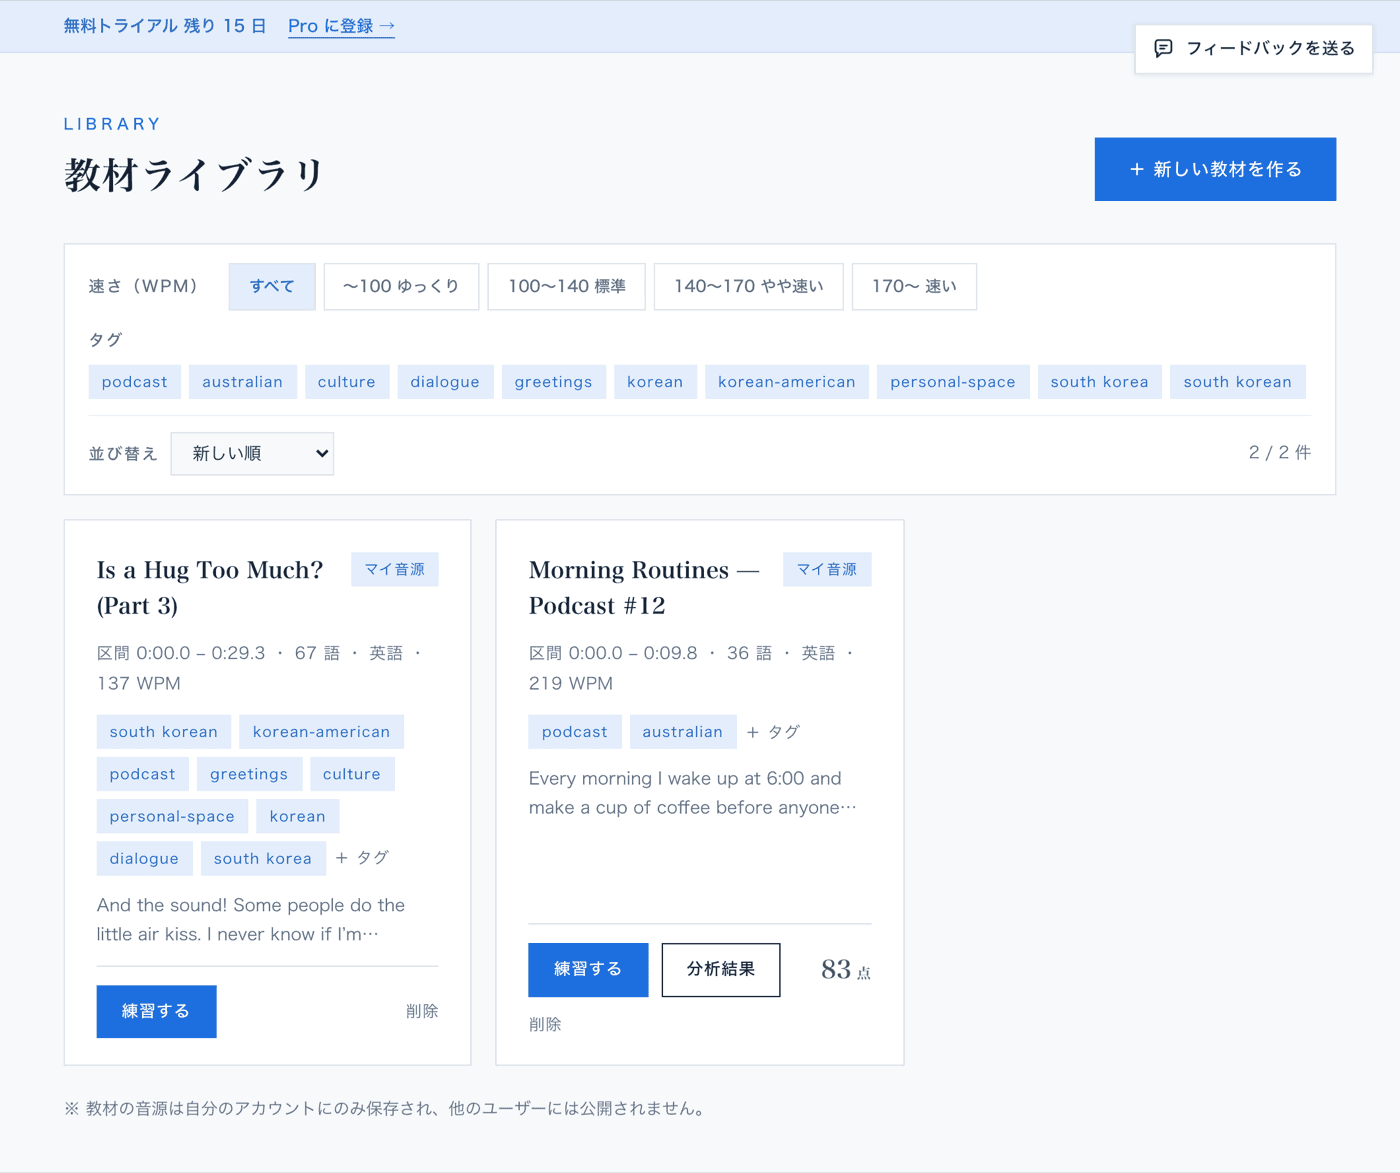
As the library grows, tags and filters keep it easy to find things.
Each card shows the region, word count and language plus the speed (WPM). Analysed materials also show the best score and a “Results” button.
Press “+ Tag” on a card to add or remove tags (Enter confirms). Click a tag to filter by it.
The filter bar combines a WPM band, tags and the sort order (newest / WPM / score). The filter is kept in the URL, so it survives when you come back.
“Delete” removes the material together with its takes (this cannot be undone).
iPhone app (beta, in preparation)
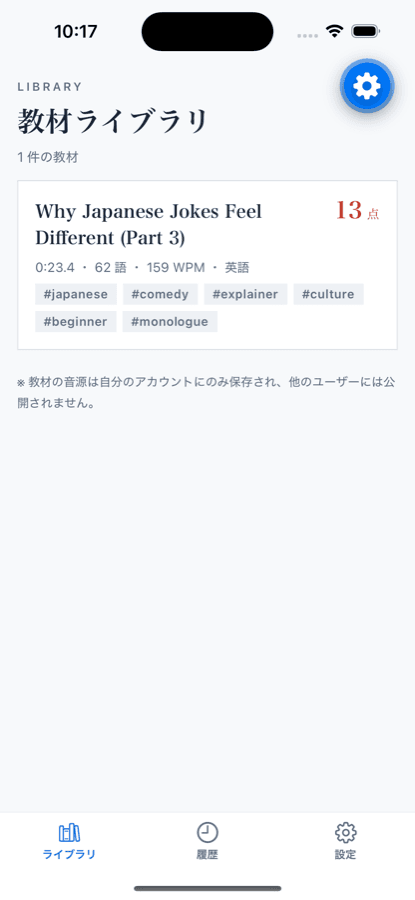
A practice-focused app. Sign in with the same account as the web and the materials you made on the PC are right there.
Sign in with the same email address and password as on the web.
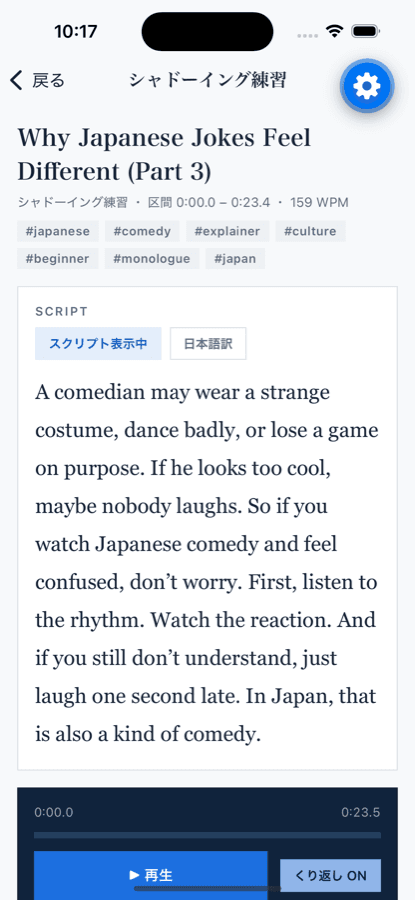
The flow is the same as on the web: library → practice (playback, speed, script / translation toggles, karaoke highlight) → record → AI analysis → report. Dialogues let you choose your role.
To save vocabulary, tap a word to select it and tap the neighbouring word to extend it to a phrase; “Save to vocabulary” stores it. The vocabulary tab can regenerate meanings and delete items.
Creating materials (audio upload, region selection) and managing the plan stay on the web. Practice minutes and scores from the app show up in the web history too.
/billingPlan and billing
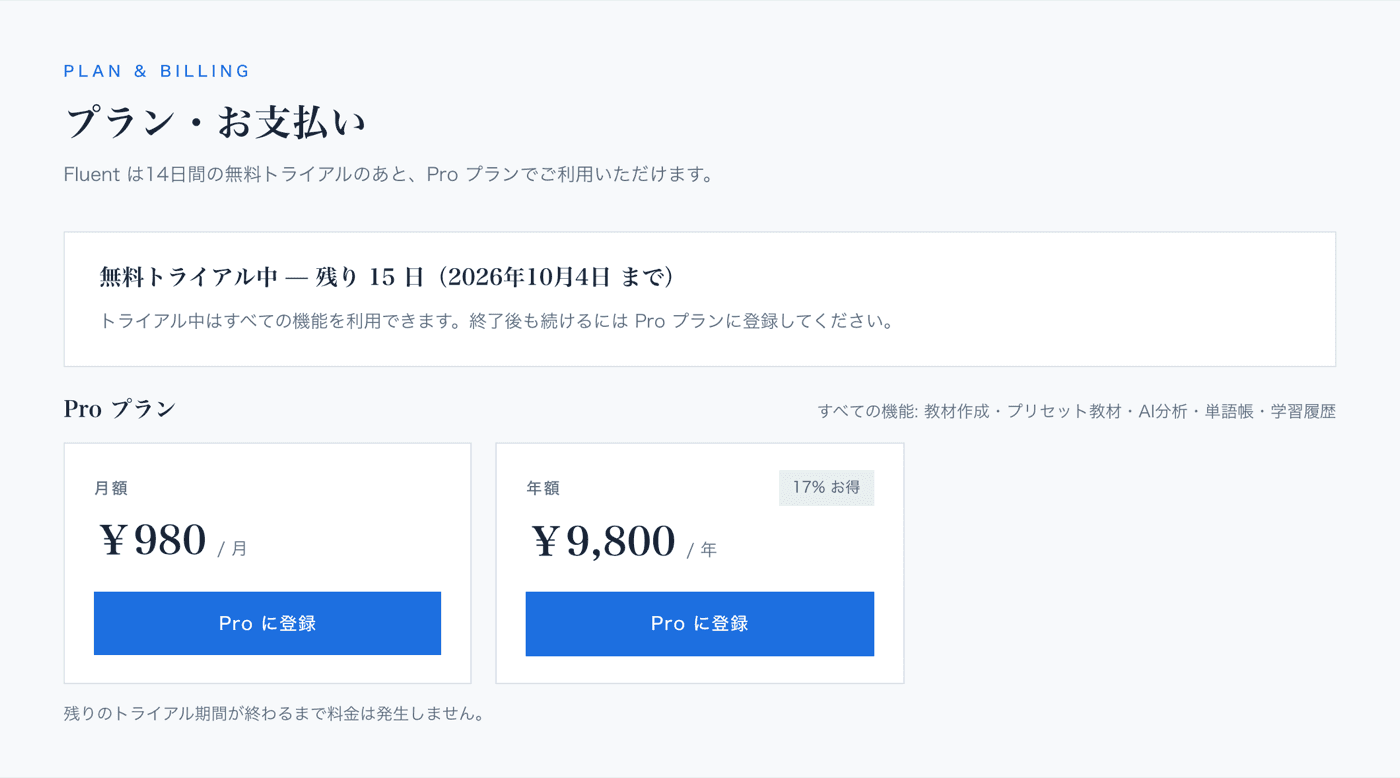
After the 14-day free trial, Fluent continues on the Pro plan.
Open “Plan & billing” in the sidebar to see your state: the free trial with the days left, or the Pro plan with the next renewal date.
“Subscribe to Pro” takes you to Stripe's checkout page. Choose monthly or yearly; nothing is charged until the remaining trial period ends.
Once subscribed, “Manage billing” lets you change the card, see invoices and cancel. After cancelling you keep access until the end of the period.
When the trial ends, every page except plan and settings closes, but your materials and history are kept. Subscribe to Pro and you pick up where you left off.
/settings/feedbackSettings and feedback
Defaults that fit you, and how to reach the developer.
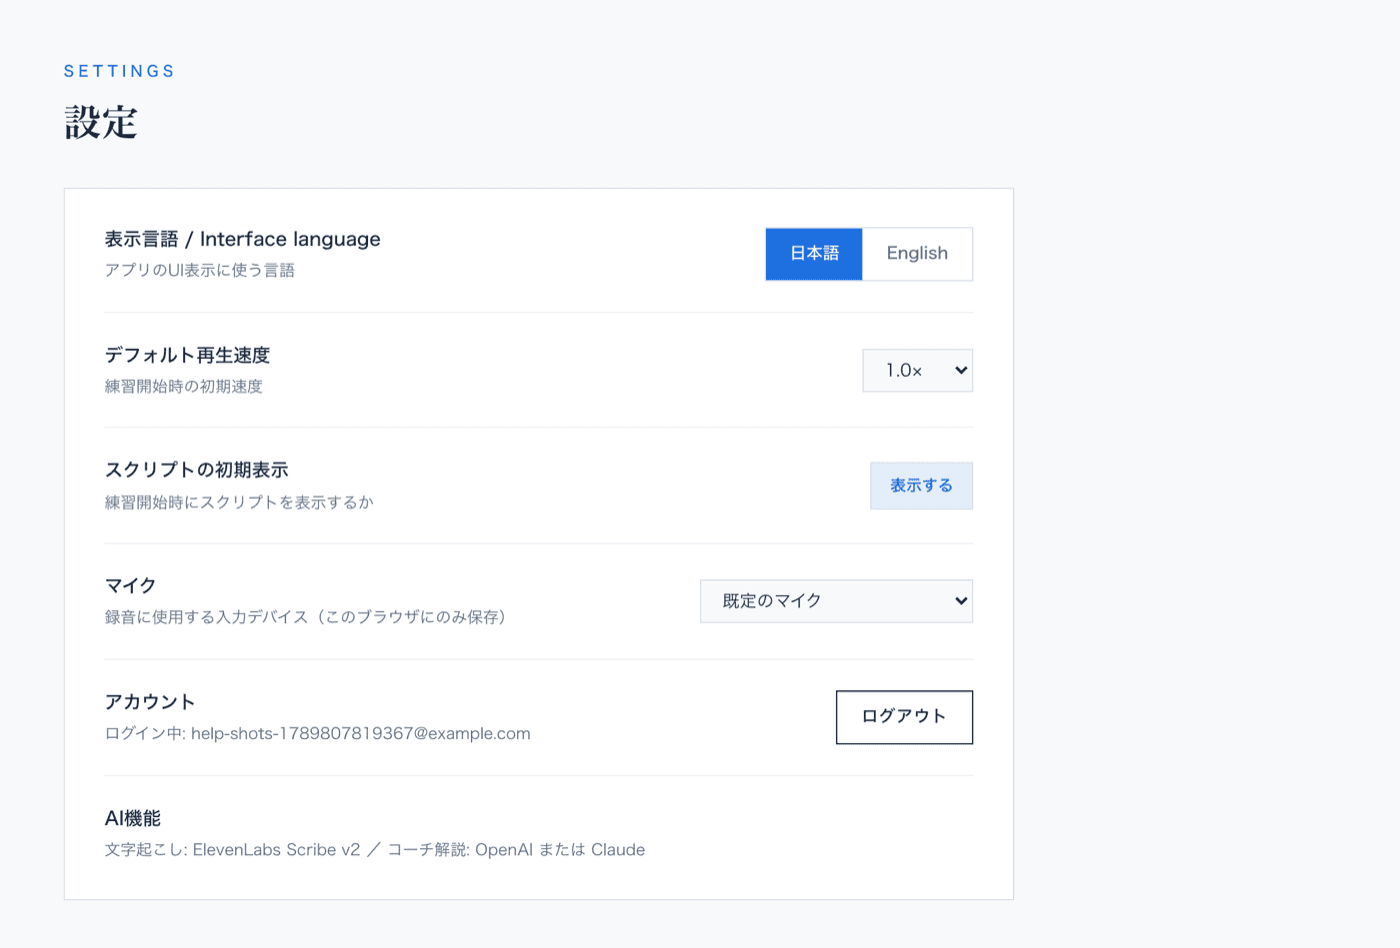
In “Settings” you can change the interface language (Japanese / English), the default playback speed, whether the script is shown when practice starts, and the microphone used for recording. Changes are saved on the spot.
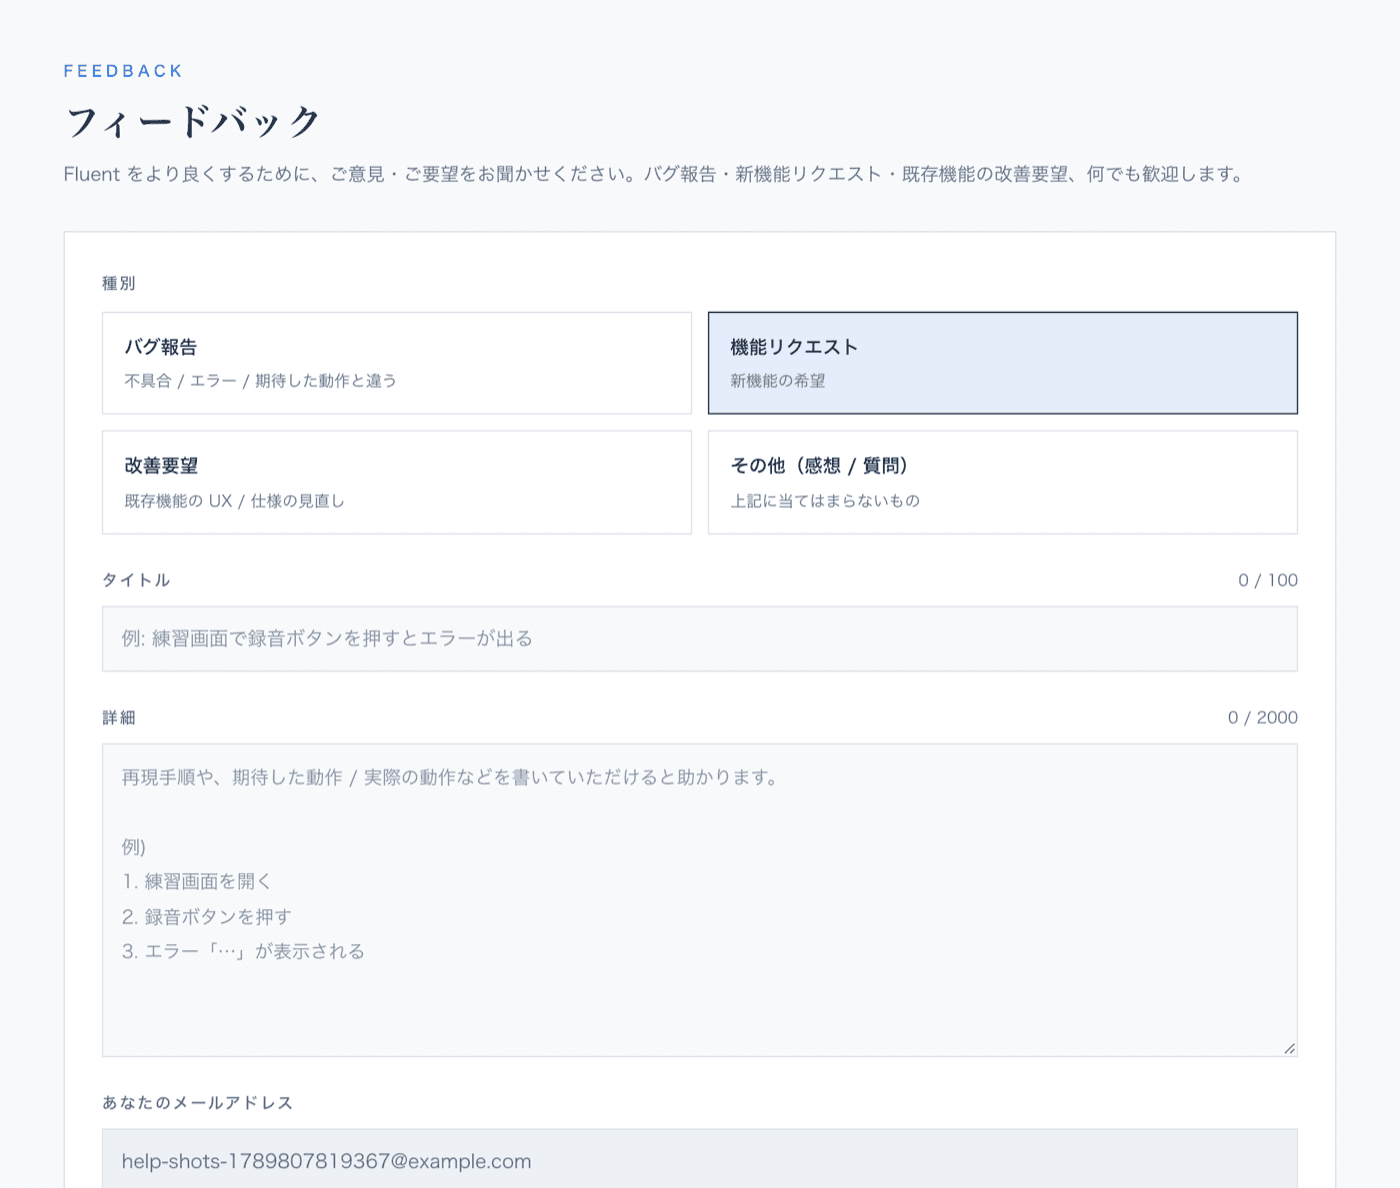
Bugs and ideas go through the “Send feedback” button in the top-right corner of every screen: pick a type, write a title and the details, and press “Send”.
For a bug report, the steps to reproduce it and the screen where it happened help a lot.
FAQ and troubleshooting
When something does not work, check here first. If it is still not solved, let us know through feedback.
No microphone prompt / cannot record
Open the site settings from the icon on the left of the address bar, set the microphone to “Allow” and reload the page. For an external microphone, choose the input device under Settings → Microphone. Recording needs an HTTPS connection.
No sound from the model
On iPhone / iPad the silent switch (ring/silent) can mute browser audio: flip it and check the volume. With Bluetooth earphones, make sure the output is routed to them.
The transcription is off / wrong
Edit the script text directly before saving; the per-word timings are re-estimated automatically. Audio with background music or overlapping speakers transcribes worse, so pick a clean region where you can.
The analysis is slow / never finishes
Speech recognition plus the AI coach usually take 20–60 seconds (longer regions take longer). If an error shows up, press “Analyse with AI” again with the same take. Reloading the page discards the take, so record again in that case.
Which browsers are supported?
The latest Chrome, Safari and Edge. Phone browsers work too, but recording is more reliable in a desktop browser or the iPhone app.
Can other people hear my recordings?
No. Your audio and recordings are stored in your account only and no other user can access them. You can delete materials and recordings at any time.